Craft a Dream Wedding - Tips to Cut Wedding Costs with Crafts
Since we're talking about weddings this month, I thought I'd share this awesome article about cutting wedding costs with crafts. Check it out!
http://www.craftandhobby.org/cgi-bin/pressrelease.cgi?func=ShowRelease&releaseid=238
Thursday, June 26, 2008

Sunday, June 22, 2008
Wedding and Anniversary Celebration Cards
 Love is in the air
Create a personal card for the special couple.
Here's What You'll Need
Aleene's Original Tacky Glue
Aleene's Glue Sticks
Scissors
Ruler
Pencil
Bowl
Decorative edge scissors
Greeting card, blank
Fun foam, white
Additional Materials for Pink Card
Micro beads: pearl, silver
Seeds beads: 6 pink, 12 green
Parchment paper: beige, pink
Toothpick
Toothpick
Additional Materials for Blue Card
Micro beads, silver
Artistic Wire, 22 gauge blue ice
Parchment paper, blue
Wire cutter
Round nose pliers
How to Make Them
1. Cut parchment paper slightly smaller than card, using decorative edge scissors. Glue to card, using Glue Stick. For pink card, cut a square from beige parchment paper. Glue to center of card.
2. For cake, cut a 1/4" wide strip from foam sheet. Cut three pieces in graduated lengths. Cut two 1/8" wide pieces for each cake to separate layers. Cut a pedestal from foam.
3. Glue pieces to cards, using Tacky Glue and photo as a guide for placement. Let dry.
Pink Cake
1. Apply a thin layer of Tacky Glue to layers of cake and along edge of beige paper. Working over bowl, immediately sprinkle on pearl beads. Press with finger to adhere. Place pearl beads back in container. Repeat for silver beads on cake pedestal.
2. Glue seed beads along edges of cake layers to create flowers, placing green beads on their sides for leaves.
Blue Cake
1. Apply silver beads and stripes along edges of card following instructions above. Let dry.
2. Cut two 1/2" lengths of wire. Shape into hearts, using round nose pliers. Set aside. Cut lengths of wire slightly longer than cake layers. Slightly crinkle wire and flatten. Glue hearts to top of cake and crinkly wire to top of each cake layer.
Saturday, June 14, 2008
 I LOVE Birthday's that Keep Going and Going and Going
 I just had to share a couple of gifts I received after my birthday - one old, some very trendy and all so me!
Thanks, my friends and family for making my special day - extra looooong.
The first was a gift from my sister - it is VERY old. When we were little, our great uncle gave my sister a birthday card with three fancifully dressed girls. Way back then, my dad traced around the girls on thin wood and cut them out. He somehow glued the card to the wood and a few (a lot of fews) years later it still looks fantastic!
 My parents gave me these adorable butterfly sandals - I love them! BTW, they're from Avon.
 STARBUCKS!!! I received this Starbuck's glass from a friend. She sees me everyday and noticed how I recycle my glass from my Venti Black Iced Tea from Starbucks - fun thing is, most of the time someone else picks it up for me and their name is written on my glass.
 Well, this glass is double walled, very thick plastic, doesn't weep and included a permanent straw!!! It's perfect, because I stopped going to Starbucks - why pay $2.10 for a glass of tea when I can make it at home for a couple pennies? So now, I make my tea at home and use my handy dandy new glass. It has been all the rage around the office - everyone wants one, but they're hard to come by.
 Last Saturday morning, I went out for my walk later than usual and I was surprised to find quite a commotion in the process. They were filling up a hot air balloon. Needless to say, I had to return home and get my camera to capture the event, right in my own backyard. It was a very windy day and it was scary to watch them turn on the 'fire' to inflate the balloon - it was fantastic to see!
Creatively yours,
Joan
Monday, June 02, 2008
Wedding Gift Wrap & Centerpiece Idea

It's wedding season! Do you have a wedding gift that you want to wrap in a special way or need a unique bridal shower centerpiece? This 'cake' is paper mache boxes frosted with Aleene's True Snow with silk flowers and trim glued on for color.
Someone saw the photo and thought it was a real wedding cake. I love it!
Here's What You'll Need
Aleene's True Snow
Aleene's Fast Grab Tacky Glue
3 Paper mache boxes (I used 12", 10" & 8")
Flat edge knife
3-1/2 yards of 1/2" wide braid (color to go with flowers)
Silk flowers, ivy, large leaves
2-1/2 yards of 2" wide ribbon (floral)
2" x 3" cardstock
Pen
Here's How to Make It
Frosting - Apply Aleene's True Snow to sides and lids of boxes, using knife. Apply Snow thinly below rim of box so lid will fit. Let dry. You can also mix acrylic paint with the Snow before it's applied or brush on after its dry.
Icing - Glue braid 'icing' around edges of lids. Glue two pieces around 12" box. Let dry.
Assembly - Glue top of large lid to bottom of medium box and top of medium lid to bottom of small box. Refer to photo.
Flowers and Greenery- Glue flowers and ivy on top of cake lids. Glue large leaves around edge of large bottom box.
Ribbon - Cut 15 (3") pieces of ribbon. Glue short ends together, crimping ends to gather. Glue randomly among flowers.
Cut remaining ribbon in half. Glue on top of cake allowing streamers to cascade down sides of cake.
Card - Write names on card. Glue flowers and small piece of ribbon to card. Glue to top of cake.
Place your gift in the boxes and you'll have a beautiful 'present'ation or place where you need a splash of color at the bridal shower - this will be the perfect keepsake for the couple to keep their wedding mementos. This would make a great birthday presentation too!
Enjoy the moment!
Joan
Summer Tote Bags
Tote Your Stuff in Style 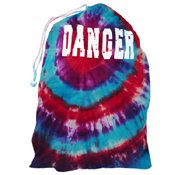
It's summer and that means toting everything from laundry to swimsuits to just plain ol' stuff. Handle your summer gear in awesome tie-dye bags that you make uniquely your own - it's summer easy with Tulip One-Step Tie-Dye and the cool bags from http://www.organize.com/.
Check out the five examples at
http://www.duncancrafts.com/ProjectDetails.aspx?id=fa64daa0-cbaa-4cf7-a3aa-6685677dd71b
And here's where to find the laundry bags at organize.com
http://www.organize.com/grlabagwidr.html?Prod_ID=grlabagwidr&qid=


It's summer and that means toting everything from laundry to swimsuits to just plain ol' stuff. Handle your summer gear in awesome tie-dye bags that you make uniquely your own - it's summer easy with Tulip One-Step Tie-Dye and the cool bags from http://www.organize.com/.
Check out the five examples at
http://www.duncancrafts.com/ProjectDetails.aspx?id=fa64daa0-cbaa-4cf7-a3aa-6685677dd71b
And here's where to find the laundry bags at organize.com
http://www.organize.com/grlabagwidr.html?Prod_ID=grlabagwidr&qid=

Sunday, June 01, 2008
Birthday Celebrations
My Birthday Two Weeks - Bubbles, Rock Therapy, Friends, Yummy Food, The Ocean, The Mountains, Hiking and More Hiking...
 I thought last year's monumental birthday was fabulous, but this year was a different kind of fabulous!
I had taken a long weekend early in May that was terrific and I thought three days away would get my creativity going and take my numbness away. It only took a couple days back at work to realize I needed a REAL vacation to get me going again.
I contemplated going out of state (thanks to my friends who invited me to faraway and fun places, but I needed to get into 'vacation mode' very quickly and cheaply). It was a quick and last minute decision to go to a place I have been many times and love - Cambria. It's a quaint, artsy small town on California's Central Coast. No cell phone reception and no computers for six wonderful days. I didn't have any specific plans, so it was wonderful to get up when I wanted, hike when I wanted and do whatever my heart wanted to do.
I rented a fantastic house near the ocean and across the street was a preserve with 240 acres of hiking trails. The trails presented everything from very secluded forests to ocean cliffs to wild flowers...ahhhhhhhhhh. I enjoyed the unusual sunshine and wonderful weather. I have been to Cambria so many times but never knew these trails existed.
Every morning I got up and fixed a nice breakfast (I have to admit breakfast is a hard one for me since I'm usually already sitting at my desk anywhere between 6:30 and 7:00). I love to cook and haven't taken the opportunity to do it for a very long time. I took along my lovely new apron I picked up on my trek to Big Sur. Notice I said took along - it looked quite lovely hanging over a towel rack in the kitchen. I'll break it in one of these days. I've already invited over a friend for my signature Broccoli and Chicken Crepes.
 One day I spread out a plastic tablecloth and got into something I've wanted to try for awhile - I call it Rock Therapy or Burden Therapy. I chose my rocks before I left home - the rocks in themselves are an interesting story - I asked my bro for rocks when I saw him a couple weeks ago and he said 'sure', but did I get them? No. I was out for a walk shortly before I went on vacation and happened to take a little detour (I don't remember the reason) and right there in front of me were awesome rocks, like they were waiting for me to stumble across them.
 The idea behind the rocks is to think about your 'burdens' or things you'd like to change or be able to dump from your brain. I selected a rock for each of my categories and got out my nontoxic paint and painted them - no rules and no preconceived ideas of how they should look when they're done. It was fantastic! I was amazed at the direction that most of them took. I let them sit for the next couple of days because it was party time! (there's more to the rock story).
On my actual birthday, my sister, joined me for an impromptu day - we did the two hour hiking trail (we both got a little sunburned). We went to lunch at my favorite bbq place in town, we drove around the area, had birthday pastries at my favorite restaurant and just chilled.
 The next day my friend, Frances, took the 2-1/2 hour drive over to spend the day with me - again, the 2 hour trail, lunch at a restaurant overlooking the ocean and some much needed girl time.
Here's Frances on the trail.
 Oh, yes, the bubbles - I have always had a fascination with bubbles, so this year I decided to buy a cute little bubble machine - I found the perfect designer one at Target for only $9.99 (including 6 batteries). There were so many beautiful bubbles! I am in the process of taking some of the photos, cropping them and having them enlarged.
 I thought last year's monumental birthday was fabulous, but this year was a different kind of fabulous!
I had taken a long weekend early in May that was terrific and I thought three days away would get my creativity going and take my numbness away. It only took a couple days back at work to realize I needed a REAL vacation to get me going again.
I contemplated going out of state (thanks to my friends who invited me to faraway and fun places, but I needed to get into 'vacation mode' very quickly and cheaply). It was a quick and last minute decision to go to a place I have been many times and love - Cambria. It's a quaint, artsy small town on California's Central Coast. No cell phone reception and no computers for six wonderful days. I didn't have any specific plans, so it was wonderful to get up when I wanted, hike when I wanted and do whatever my heart wanted to do.
I rented a fantastic house near the ocean and across the street was a preserve with 240 acres of hiking trails. The trails presented everything from very secluded forests to ocean cliffs to wild flowers...ahhhhhhhhhh. I enjoyed the unusual sunshine and wonderful weather. I have been to Cambria so many times but never knew these trails existed.
Every morning I got up and fixed a nice breakfast (I have to admit breakfast is a hard one for me since I'm usually already sitting at my desk anywhere between 6:30 and 7:00). I love to cook and haven't taken the opportunity to do it for a very long time. I took along my lovely new apron I picked up on my trek to Big Sur. Notice I said took along - it looked quite lovely hanging over a towel rack in the kitchen. I'll break it in one of these days. I've already invited over a friend for my signature Broccoli and Chicken Crepes.
 One day I spread out a plastic tablecloth and got into something I've wanted to try for awhile - I call it Rock Therapy or Burden Therapy. I chose my rocks before I left home - the rocks in themselves are an interesting story - I asked my bro for rocks when I saw him a couple weeks ago and he said 'sure', but did I get them? No. I was out for a walk shortly before I went on vacation and happened to take a little detour (I don't remember the reason) and right there in front of me were awesome rocks, like they were waiting for me to stumble across them.
 The idea behind the rocks is to think about your 'burdens' or things you'd like to change or be able to dump from your brain. I selected a rock for each of my categories and got out my nontoxic paint and painted them - no rules and no preconceived ideas of how they should look when they're done. It was fantastic! I was amazed at the direction that most of them took. I let them sit for the next couple of days because it was party time! (there's more to the rock story).
On my actual birthday, my sister, joined me for an impromptu day - we did the two hour hiking trail (we both got a little sunburned). We went to lunch at my favorite bbq place in town, we drove around the area, had birthday pastries at my favorite restaurant and just chilled.
 The next day my friend, Frances, took the 2-1/2 hour drive over to spend the day with me - again, the 2 hour trail, lunch at a restaurant overlooking the ocean and some much needed girl time.
Here's Frances on the trail.
 Oh, yes, the bubbles - I have always had a fascination with bubbles, so this year I decided to buy a cute little bubble machine - I found the perfect designer one at Target for only $9.99 (including 6 batteries). There were so many beautiful bubbles! I am in the process of taking some of the photos, cropping them and having them enlarged.
Here are some more pictures from my vacation:

Hearst Castle is always a showstopper.
 Here's a wreath at the house I stayed at - very simple, very unusual.

The theme of the house was lighthouses and all things nautical. I just loved this picture!


Hearst Castle is always a showstopper.
 Here's a wreath at the house I stayed at - very simple, very unusual.
The theme of the house was lighthouses and all things nautical. I just loved this picture!

A sunset overlooking the Pacific Ocean taken just a few steps from the house.

Art is in the eye of the beholder. A driftwood 'plant' in the 'town' of San Simeon.

Near Ragged Point on Highway 1

Art is in the eye of the beholder. A driftwood 'plant' in the 'town' of San Simeon.

Near Ragged Point on Highway 1
Before I left for the coast, a friend invited me to a local lake for a day of hiking, sitting on the deck and relaxing.
 Well, strange as it may be, we had a very cold storm move in for Memorial Day Weekend - you can see here, I had on my coat and gloves - it was a might chilly. We had an early birthday lunch overlooking the lake, sat in front of a warm fireplace, we did sit and do nothing and we did hike - only the rain and hail started coming down pretty good so we had to take a little break in an under construction home. Loved it!
The next day a friend and I got together for an early birthday breakfast at a new restaurant in
town. I suggested the Maple Nut Coffeecake French Toast. I had a bite and it was fabulous!
Thank you to all my friends and family who made the last couple of weeks so special and thank you not just for the NOW, but thank you for the ALL THE TIME.
Oh, I almost forgot - the Rock /Burden Therapy was awesome. After my guests left, I sat and journaled about each rock, the person, place or thing I had 'rocked' on. If that wasn't wonderful enough, I took a drive up the coast and one at a time and with much thought and even a few words said outloud, I tossed each rock into the ocean.
Make it a great week - it will be interesting to see what's changed over the nine days that I was gone...
 Well, strange as it may be, we had a very cold storm move in for Memorial Day Weekend - you can see here, I had on my coat and gloves - it was a might chilly. We had an early birthday lunch overlooking the lake, sat in front of a warm fireplace, we did sit and do nothing and we did hike - only the rain and hail started coming down pretty good so we had to take a little break in an under construction home. Loved it!
The next day a friend and I got together for an early birthday breakfast at a new restaurant in
town. I suggested the Maple Nut Coffeecake French Toast. I had a bite and it was fabulous!
Thank you to all my friends and family who made the last couple of weeks so special and thank you not just for the NOW, but thank you for the ALL THE TIME.
Oh, I almost forgot - the Rock /Burden Therapy was awesome. After my guests left, I sat and journaled about each rock, the person, place or thing I had 'rocked' on. If that wasn't wonderful enough, I took a drive up the coast and one at a time and with much thought and even a few words said outloud, I tossed each rock into the ocean.
Make it a great week - it will be interesting to see what's changed over the nine days that I was gone...
Thursday, May 22, 2008
Graduation Crafts
 Congratulation Grads!
Celebrate your special grad!
Check out how to make these adorable graduation caps at http://stores.lulu.com/store.php?fStoreID=2188713. They are made with shrink plastic or even by recycling #6 plastic!!! Color the plastic with permanent pens in your school colors!!!
MTV Gift Lounge 

I never know what exciting thing I will get to work on - Gloria (my graphic design friend) and I had so much fun doing these signs that will go with product at the MTV Gift Lounge coming up at the end of the month. They are very dimensional and colorful - the Crafty Chica is very glittery, the Collage Pauge is very collagie and the Iron-On Crystal sign is very sparkly!!! Gloria did a great job cutting, gluing and putting her style on the signs!
 A fun twist to this project was having Gloria's cubiclemate getting involved helping with the words - he just added it to everything we brainstormed, so his new nickname is Crick It - his name is Kirk and Kirk It didn't roll off the tongue, so I renamed him Crick It - I razzed him this morning that he's actually responding to his new name - love IT!


I never know what exciting thing I will get to work on - Gloria (my graphic design friend) and I had so much fun doing these signs that will go with product at the MTV Gift Lounge coming up at the end of the month. They are very dimensional and colorful - the Crafty Chica is very glittery, the Collage Pauge is very collagie and the Iron-On Crystal sign is very sparkly!!! Gloria did a great job cutting, gluing and putting her style on the signs!
 A fun twist to this project was having Gloria's cubiclemate getting involved helping with the words - he just added it to everything we brainstormed, so his new nickname is Crick It - his name is Kirk and Kirk It didn't roll off the tongue, so I renamed him Crick It - I razzed him this morning that he's actually responding to his new name - love IT!
Sunday, May 18, 2008
Starry Americana

Are you ready for the upcoming long weekend? I know I sure am! A friend has invited me to a nearby lake to enjoy the cooler weather and for a hike - I hear there's some mandatory sitting on the deck time too.
Here's a simple project to brighten up your weekend. Apply to backs of plates and outside of bowls.
Here's What You Need
Aleene's Clear Gel Tacky Glue
Tissue paper: white, red, blue
Paintbrush, foam
Partyware, glass or plastic
Scissors
Here's How to Make It
~ Cut out different size stars from tissue paper.
~ Brush glue in a small area on partyware. Place stars over glue. Brush glue over stars. Continue adding stars until desired look is achieved.
Use this same idea for all your holidays just change the tissue shapes.
Clean with a damp sponge.
Sunday, May 11, 2008
Delightful Mother's Day
 Twenty-five of us spent the day together including my mom and family and my sister-in-law's family. We had wonderful food, superb weather - my family lives on a farm, so we ran all over 40 acres of farm land. I took a few pictures -
The lavender flowers are actually alfalfa that's past it's prime.

The building with roses is our neighbors - I liked the contrast of the roses on the rustic building.
 My family was quite proud to have their oats baled on Saturday - 838 (I think) bales! My dad planted the hollyhocks many years ago and they just keep coming back year after year.
The weekend had many high points and Saturday was a day of sadness, but also a celebration of a very full and long lived life. My seventh grade teacher, Mrs. Wilson, passed away this week - she was a very strong influence on me, the members of my family and many, many others. Her husband was the principal of the very small elementary school my family attended, so we had a very tight community.
At the funeral, I saw friends from my elementary school I hadn't seen in ages and even saw my kindergarten teacher - I won't even mention how many years it's been since I've seen her - I didn't recognize her (OK, she didn't recognize me, either!). It was strange to see my 4th grade teacher, who, back in the day, seemed like a giant - when she took off her shoes, we were about the same height. A very touching part of the funeral was when the minister read part of Mrs. Wilson's life story - written by her. So much I didn't know about her...
When I began my singing lessons recently, Mrs. Wilson was on my mind - she was my singing teacher - everyone was required to take singing, so it wasn't as if I was special, but she did influence me considerably.
Over the years I have written to the Wilson's when I was not living close enough to visit - I am so glad I took the time to let them know how special they were to me.
 Twenty-five of us spent the day together including my mom and family and my sister-in-law's family. We had wonderful food, superb weather - my family lives on a farm, so we ran all over 40 acres of farm land. I took a few pictures -
The lavender flowers are actually alfalfa that's past it's prime.

The building with roses is our neighbors - I liked the contrast of the roses on the rustic building.
 My family was quite proud to have their oats baled on Saturday - 838 (I think) bales! My dad planted the hollyhocks many years ago and they just keep coming back year after year.
The weekend had many high points and Saturday was a day of sadness, but also a celebration of a very full and long lived life. My seventh grade teacher, Mrs. Wilson, passed away this week - she was a very strong influence on me, the members of my family and many, many others. Her husband was the principal of the very small elementary school my family attended, so we had a very tight community.
At the funeral, I saw friends from my elementary school I hadn't seen in ages and even saw my kindergarten teacher - I won't even mention how many years it's been since I've seen her - I didn't recognize her (OK, she didn't recognize me, either!). It was strange to see my 4th grade teacher, who, back in the day, seemed like a giant - when she took off her shoes, we were about the same height. A very touching part of the funeral was when the minister read part of Mrs. Wilson's life story - written by her. So much I didn't know about her...
When I began my singing lessons recently, Mrs. Wilson was on my mind - she was my singing teacher - everyone was required to take singing, so it wasn't as if I was special, but she did influence me considerably.
Over the years I have written to the Wilson's when I was not living close enough to visit - I am so glad I took the time to let them know how special they were to me.
Sunday, May 04, 2008
Mother's Day Garden Party Brunch
Garden Party Perfect for Mother's Day
or Anytime!
What You'll Need for Wreath
Aleene's Super Thick Tacky Glue
18" Grapevine Wreath
Garden Shears
9-3/4" Plastic Gazebo (found in cake decorating dept)
Spanish Moss
Flowers, Assorted Mini Silk or Dried Garland with Small Leaves
Fence, Miniature Wood
How to Make It
1. To make an area on wreath to hold gazebo, cut grapevine from about 1/4 of wreath, using garden shears. Pull wreath apart slightly.
2. Assemble gazebo, following manufacturer's instructions. Glue gazebo on prepared section of wreath, near center, referring to photo.
3. Glue moss and flowers around gazebo and on top of gazebo. Cut two pieces of fence to desired length. Glue on both sides of wreath. Let dry.
4. Wrap garland around wreath. Glue flowers and leaves on wreath. Refer to photo.
What You'll Need for Invitations, Food Tags and Favors
Aleene's Original Tacky Glue Sticks
Aleene's Super Thick Tacky Glue
Floral Paper
Decorated Edge Scissors
Parchment Paper, beige
Computer and Printer OR Pen
Blank Cards, beige
Spanish Moss
Porcelain Flowers, small
Bubble Envelope for each invitation, if mailing
Permanent Pens: white, black
Silk Leaves: 2 large for each favor
Flower Seeds
Flowers: Silk or dried
Ribbon, 1/2" wide yellow
Fence, Miniature Wood
How to Make Them
 Invitations
1. Cut floral paper slightly smaller than card, using decorating edge scissors.
2. Print "Garden Party" on parchment paper, using computer and printer or write by hand.
3. Cut parchment paper slightly smaller than floral paper, using decorative edge scissors. Glue parchment paper on floral paper, using Glue Stick. Glue floral paper to card.
4. Glue a section of fence on parchment paper. Glue moss on bottom of fence and porcelain flowers on fence.
NOTE: Hand deliver these special invitations or mail in bubble envelopes.
Food Tags
1. Cut a section of fence and an extra fence post for each tag. Glue extra post at bottom of fence for stake. Let dry.
2. For label, cut a 1/2" x 1-1/4" piece from parchment paper. Write name of food on piece, using black permanent pen. Glue tag on fence. Let dry.
 Favors
1. Write guest's name on a leaf, using white permanent pen. Glue two leaves together, leaving a 1" opening. Let dry. Fill with seeds. Glue shut. Trim edges, if necessary.
2. Glue silk or dried flowers along edge of leaf above name.
3. Tie a small two-loop bow. Glue bow at stem of leaves.
4. Print planting instructions on parchment paper. Cut out around instructions to make a 5" x 3-1/4" piece. Cut floral paper slightly larger than parchment piece. Glue parchment paper on floral paper, using Glue Stick. Glue favor on parchment paper.
 What You'll Need for Fruit Dip
8 oz. Cream Cheese
Mixing Bowl
7 oz. Jar Marshmallow Cream
1/4 Cup Strawberry Preserves
Spoon
Small Bowl
Serving Plate
Knife
Assorted Fruit
How to Make It
1. Soften cream cheese in mixing bowl. Add marshmallow cream and strawberry preserves.
2. Stir ingredients by hand until smooth. Place in small bowl.
3. Place dip in center of serving plate.
4. Slice fruit into 1/4" wedges. Leave strawberries whole.
5. Insert Fruit Dip Food Tag.
What You'll Need for Canapes
White Bread
Sharp Knife
Oven
Pastry Brush
Butter of Margarine, melted
Gherkin Pickles
Cheddar Cheese (slices)
Spoon
Dry Italian Dressing Mix
8 oz. Package Cream Cheese (softened)
Serving Plate
Silk Flowers
How to Make Them
1. Remove crusts from bread. Cut each slice into four equal pieces.
2. Place oven tray 3"-4" from heat. Preheat oven to broil.
3. Brush one side of bread with melted butter or margarine. Place in oven. Toast 3-4 minutes or until golden brown on buttered side.
4. For flower leaves, make a thin lengthwise cut on two sides of pickle. For stems, cut a 1/8" x 2" piece from pickle. Cut cheese in Tulip shape, approximately 1" square.
5. For spread, stir dressing mix into cream cheese to taste. Just before serving, spread cream cheese mixture on unbrowned side of bread. Place pickles and cheese on spread.
6. Serve canapes on plate. Add a sprinkling of silk flowers.
We're having a Mother's Day Brunch for my mom this Sunday and I can't wait to make these yummy recipes and projects again!
Joan
or Anytime!

What You'll Need for Wreath
Aleene's Super Thick Tacky Glue
18" Grapevine Wreath
Garden Shears
9-3/4" Plastic Gazebo (found in cake decorating dept)
Spanish Moss
Flowers, Assorted Mini Silk or Dried Garland with Small Leaves
Fence, Miniature Wood
How to Make It
1. To make an area on wreath to hold gazebo, cut grapevine from about 1/4 of wreath, using garden shears. Pull wreath apart slightly.
2. Assemble gazebo, following manufacturer's instructions. Glue gazebo on prepared section of wreath, near center, referring to photo.
3. Glue moss and flowers around gazebo and on top of gazebo. Cut two pieces of fence to desired length. Glue on both sides of wreath. Let dry.
4. Wrap garland around wreath. Glue flowers and leaves on wreath. Refer to photo.
What You'll Need for Invitations, Food Tags and Favors
Aleene's Original Tacky Glue Sticks
Aleene's Super Thick Tacky Glue
Floral Paper
Decorated Edge Scissors
Parchment Paper, beige
Computer and Printer OR Pen
Blank Cards, beige
Spanish Moss
Porcelain Flowers, small
Bubble Envelope for each invitation, if mailing
Permanent Pens: white, black
Silk Leaves: 2 large for each favor
Flower Seeds
Flowers: Silk or dried
Ribbon, 1/2" wide yellow
Fence, Miniature Wood
How to Make Them
 Invitations
1. Cut floral paper slightly smaller than card, using decorating edge scissors.
2. Print "Garden Party" on parchment paper, using computer and printer or write by hand.
3. Cut parchment paper slightly smaller than floral paper, using decorative edge scissors. Glue parchment paper on floral paper, using Glue Stick. Glue floral paper to card.
4. Glue a section of fence on parchment paper. Glue moss on bottom of fence and porcelain flowers on fence.
NOTE: Hand deliver these special invitations or mail in bubble envelopes.
Food Tags
1. Cut a section of fence and an extra fence post for each tag. Glue extra post at bottom of fence for stake. Let dry.
2. For label, cut a 1/2" x 1-1/4" piece from parchment paper. Write name of food on piece, using black permanent pen. Glue tag on fence. Let dry.
 Favors
1. Write guest's name on a leaf, using white permanent pen. Glue two leaves together, leaving a 1" opening. Let dry. Fill with seeds. Glue shut. Trim edges, if necessary.
2. Glue silk or dried flowers along edge of leaf above name.
3. Tie a small two-loop bow. Glue bow at stem of leaves.
4. Print planting instructions on parchment paper. Cut out around instructions to make a 5" x 3-1/4" piece. Cut floral paper slightly larger than parchment piece. Glue parchment paper on floral paper, using Glue Stick. Glue favor on parchment paper.
 What You'll Need for Fruit Dip
8 oz. Cream Cheese
Mixing Bowl
7 oz. Jar Marshmallow Cream
1/4 Cup Strawberry Preserves
Spoon
Small Bowl
Serving Plate
Knife
Assorted Fruit
How to Make It
1. Soften cream cheese in mixing bowl. Add marshmallow cream and strawberry preserves.
2. Stir ingredients by hand until smooth. Place in small bowl.
3. Place dip in center of serving plate.
4. Slice fruit into 1/4" wedges. Leave strawberries whole.
5. Insert Fruit Dip Food Tag.
What You'll Need for Canapes
White Bread
Sharp Knife
Oven
Pastry Brush
Butter of Margarine, melted
Gherkin Pickles
Cheddar Cheese (slices)
Spoon
Dry Italian Dressing Mix
8 oz. Package Cream Cheese (softened)
Serving Plate
Silk Flowers
How to Make Them
1. Remove crusts from bread. Cut each slice into four equal pieces.
2. Place oven tray 3"-4" from heat. Preheat oven to broil.
3. Brush one side of bread with melted butter or margarine. Place in oven. Toast 3-4 minutes or until golden brown on buttered side.
4. For flower leaves, make a thin lengthwise cut on two sides of pickle. For stems, cut a 1/8" x 2" piece from pickle. Cut cheese in Tulip shape, approximately 1" square.
5. For spread, stir dressing mix into cream cheese to taste. Just before serving, spread cream cheese mixture on unbrowned side of bread. Place pickles and cheese on spread.
6. Serve canapes on plate. Add a sprinkling of silk flowers.
We're having a Mother's Day Brunch for my mom this Sunday and I can't wait to make these yummy recipes and projects again!
Joan
Friday, May 02, 2008
Sweet Treat Apron
Mother's Day Gift Idea
Here's an awesome idea for your mom (or yourself!) Check out how to make it on the Home Companion site.
http://www.homecompanionmag.com/web_only_extras/sponsored_projects/sweet_treat_apron.asp
Here's an awesome idea for your mom (or yourself!) Check out how to make it on the Home Companion site.

http://www.homecompanionmag.com/web_only_extras/sponsored_projects/sweet_treat_apron.asp
Traveling in Style
 Dramatic Travel Accessories
These amazing projects make me want to get out a map and start thinking about my next trip. How about you? Is your next trek to Tuscany, San Diego, Santa Barbara, the ocean, the desert...no matter where you go, you'll be lookin' mighty fine toting these dramatic pieces.
They were created by Cheryl Ball with Tulip Flocked Iron-Ons, sparkling Tulip Glam-It-Up! Iron-On Glass Crystals and Tulip Soft Fabric Paint. You'll be amazed how quickly these accessories from http://www.organize.com/ can be transformed into amazing travel accessories. Find out how to make these beauties at www.duncancrafts.com
Enjoy dreaming about your next travels, I know I will.
Joan
Tuesday, April 29, 2008
Big Sur
 Ahhh....Big Sur!!!
I have been to Big Sur many times, but I am always enchanted with the beauty.
This last weekend the weather was spectacular, the wildflowers were in bloom and I saw so many new things.


Wednesday, April 23, 2008
Kids' Craft Dinosaur Glitter T-shirt
Sparkling Kids' Dinosaur T-shirt
Create a friendly glittering dinosaur for your special little one with a stencil made from freezer paper!
What You Need
Tulip Glitter Bond
Tulip Fashion Glitter (desired color)
Tulip Iron-On Crystals
Aleene's Jewel-It Glue
Pattern (coloring books are a great source)
Wiggle eyes
Scissors
Iron
Scratch paper
Cardboard
How To Make It

Prewash your shirt to remove sizing. Don't use fabric softener in the washer or dryer.
To make stencil, place freezer paper over pattern, with shiny side down. Trace. Cut on inside of lines.
Place stencil on T-shirt. Iron to adhere. Place cardboard inside shirt to keep glue from seeping through the layers of T-shirt.
Using sponge included with Glitter Bond, dab into Glitter Bond and dab into openings of stencil. Immediately, sprinkle on the glitter. Tap the glitter with your finger to adhere. Tap excess glitter off on scratch paper. Remove stencil.
Glue on crystals and wiggle eyes with Jewel-It. Let dry.
T-shirt can be washed after 72 hours. Turn inside out and for best results hand wash or use gentle cycle. Hang to dry.
Sunday, April 20, 2008
Lattice Spring Wreath
 A Touch of Spring!
Need a little touch of color on your fence or patio? The Aleene's Platinum Bond Patio & Garden Outdoor Adhesive keeps this project all together no matter where you hang it!
What You'll Need
Aleene's Platinum Bond Patio & Garden Outdoor Adhesive
Lattice
Saw
Silk or plastic flowers and ivy
Ribbon, waterproof for bow
Here's How to Make It
1. Cut lattice to desired size, using saw.
2. Glue flowers and ivy around edges of lattice.
3. Tie a bow using ribbon. Glue at bottom center of lattice.
Monday, April 14, 2008
Saturday in the Mountains
What a fabulous day!!!

 The weather was FANTASTIC, the air clear and the company was so much fun!
Here's Lindy and me getting ready to do the zipline at the Moaning Caverns. More on those caverns in a minute!
You approach the zipline by crossing a 60-foot long sky bridge before being strapped into a full-body climbing harness and then rigged to the cable. The zipline is 1500-feet long and you go in excess of 40 miles per hour across the 1/4 mile line. No experience necessary, all you need is the courage to step off the platform.
Here's Lindy and me hoofing it up the stairs in the cavern. Thank goodness we've been exercising at lunch.
The walking tour descends 234 steps to a depth of 165 feet below the ground through marble passages into the cavern. The tour ends on the spot were scientific excavations revealed the bones of prehistoric people who had fallen into the cavern thousands of years ago.
Me 'rock' climbing - shhhh, Lindy - don't let out my secret!
 Me on the stairs in the cavern.
Lindy and Doug!!!
 Mark Twain's Cabin - it seems a whole lot simple and oh, so SMALL!

This wasn't all of our exciting day - we went into Calaveras Big Trees, picked up ginormous pinecones, had the most awesome burger at the Snowshoe Brewery in Arnold - I even tasted Apricot Beer. Shopped a little in Jamestown on the way up and just enjoyed our way meandering through beautiful country.
The planning for the day actually started several days before this...and there was plenty of deception!!! Doug's birthday is coming up and Lindy wanted to surprise him with something special - I'd mentioned the zipline and Doug wants to bungie jump, so the planning began. There were phone calls, there were grocery shopping trips, there were plenty of giggles.
The night before our big adventure, we set the plan into motion and it was quite the plan. Per my instructions, I called Lindy the night before to plant the seed for Doug. I told her about this gigantic sale at a plant nursery. Doug and Lindy are redoing their yard and Lindy knew this huge sale would get Doug excited. When I made the phone call I was in the middle of a store - it was so hilarious! Lindy played it to the hilt!
We're already planning our next adventure - something about Circus Trees...


Let's see - we packed so much into one day in the mountains it's hard to remember everything - it was incredible. That's me behind the wheel of Lindy and Doug's convertible and yes, that's snow behind me.
We stopped by a stream to check it out and crawl around on downed trees.
 The weather was FANTASTIC, the air clear and the company was so much fun!
Here's Lindy and me
 getting ready to do the zipline at the Moaning Caverns. More on those caverns in a minute!
You approach the zipline by crossing a 60-foot long sky bridge before being strapped into a full-body climbing harness and then rigged to the cable. The zipline is 1500-feet long and you go in excess of 40 miles per hour across the 1/4 mile line. No experience necessary, all you need is the courage to step off the platform.
Here's Lindy and me hoofing it up the stairs in the cavern. Thank goodness we've been exercising
 at lunch.
The walking tour descends 234 steps to a depth of 165 feet below the ground through marble passages into the cavern. The tour ends on the spot were scientific excavations revealed the bones of prehistoric people who had fallen into the cavern thousands of years ago.
Me 'rock' climbing - shhhh, Lindy - don't let out my secret!

 Me on the stairs in the cavern.
Lindy and Doug!!!


 Mark Twain's Cabin - it seems a whole lot simple and oh, so SMALL!
This wasn't all of our exciting day - we went into Calaveras Big Trees, picked up ginormous pinecones, had the most awesome burger at the Snowshoe Brewery in Arnold - I even tasted Apricot Beer. Shopped a little in Jamestown on the way up and just enjoyed our way meandering through beautiful country.
The planning for the day actually started several days before this...and there was plenty of deception!!! Doug's birthday is coming up and Lindy wanted to surprise him with something special - I'd mentioned the zipline and Doug wants to bungie jump, so the planning began. There were phone calls, there were grocery shopping trips, there were plenty of giggles.
The night before our big adventure, we set the plan into motion and it was quite the plan. Per my instructions, I called Lindy the night before to plant the seed for Doug. I told her about this gigantic sale at a plant nursery. Doug and Lindy are redoing their yard and Lindy knew this huge sale would get Doug excited. When I made the phone call I was in the middle of a store - it was so hilarious! Lindy played it to the hilt!
We're already planning our next adventure - something about Circus Trees...
Subscribe to:
Posts (Atom)