Friday, November 30, 2007

Holly Tray
for the Holidays


The parties have begun and perhaps you'd like to take a hostess gift or you're taking your special goodies and want an extra special plate to serve them on...here's the answer! The holly tray is inexpensive, it's easy and it's fun to make!

Here's What You Need
Aleene's® Clear Gel Tacky Glue™
Tissue: red and green
Pencil
Scissors
Paintbrush, 1" wide or foam
Plate, clear glass or plastic
Hole punch - optional

Here's How to Make It
1. Place holly pattern under green tissue. Trace 12 holly leaves, using pencil. Cut out on inside of pencil lines. Cut 18 berries from red tissue or use hole punch.
2. Brush glue onto a small area on back of plate. Place two holly leaves on wet glue. Refer to photo for placement or place randomly. Brush glue over holly. Place three berries around tips of holly. Brush glue over berries. Repeat for remaining holly and berries.
3. For a textured background, apply a thick amount of glue all over plate in a patting motion. Let dry.
4. To clean plate, wipe with a damp sponge. Do not submerge in water.

Make It Your Own - Cut out different designs to make plates for all special occasions or cut out designs from napkins too! Photocopy wedding pictures for an awesome anniversary gift! Use this technique on bowls, trays - anything that's clear. It's a great gift for the teacher - use a photocopy of the class picture and add place confetti or strips of tissue in the school's colors in the blank areas of the plate - it's a gift they'll NEVER forget!

How to Wrap It - Add candy, ornaments or even a gift card to the plate and wrap in clear cellophane.

Thursday, November 29, 2007

SOCK IT TO ME DECORATED SOCKS

I was just out shopping and ran across some adorable decorated socks for $7.99 EACH!!! It reminded me of these socks I made a few holidays back and I thought I'd share them with you.

What you need to make them
Tulip® 3D Fashion Paint, desired colors
Aleene's® Fabric Fusion™
Socks
Fabric, Christmas print
Scissors
Giftwrap tube or jar
Cosmetic sponge
Plate
Waxed paper

Here's How to Make Them
1. Prewash fabric and socks using no fabric softener. Dry.
2. Loosely cut out desired designs from fabric. Place fabric, wrong side up, on waxed paper.
3. Pour a small amount of Fabric Fusion on plate. Dab sponge into glue and dab on back of fabric. This will keep the fabric from fraying. Let dry.
4. Cut closely around design.
5. Dab a generous amount of Fabric Fusion on back of fabric. Smooth on sock. Repeat until desired look is achieved.
6. Place socks on jar or giftwrap tube. Make dots or outline fabric with 3D Fashion Paint. Let dry. Socks may be washed after 72 hours. Turn inside out, machine wash gentle, line dry.

I've been feeling under the weather the last few days and just got some antibiotics tonight, so I'll have to share my tips with you another time.

Wednesday, November 28, 2007


Jolly Snowman Apron - We're counting down to Christmas with a craft a day and today's project is this cute snowman apron that you can create with a wink of the eye. The apron makes a great hostess gift, a gift for the new bride and don't forget a gift for yourself!

Here's what you need
Tulip® 3D Fashion Paint™
Shiny® Black
Shiny® Orange
Shiny® Brown
Crystals® Icicle
Fabric: white, print for scarf, black for hat
Scissors
Apron, red
3 (1/2") black buttons
Chalk pencil
Cosmetic sponge
Straight pins

Here's how to do it!
1. Prewash fabrics and apron to remove sizing. Do not use fabric softener in washer or dryer.
2. Enlarge patterns to desired size and print off - patterns are below. My snowman is about 8" tall. Cut out patterns.
3. Pin body pattern on white fabric, scarf pattern on print fabric and hat pattern on black fabric. Trace with chalk pencil. Cut out.
4. Squeeze some Fabric Fusion on paper plate. Dab cosmetic sponge in glue and dab on back of snowman fabric. Place snowman on apron. Repeat with scarf and hat.
5. Paint dots for eyes, using Black 3D Paint. Place a dot of paint where buttons will be placed on body. Gently tap buttons into paint. Paint smile and a 1/4" diameter circle at top of hat with Black.
6. For carrot, paint a long, thin triangle, using Orange. Paint sticks for arms, using Brown.
7. Paint dots for snow and squiggly line under snowman, using Crystals Icicle. Let dry.
8. Can be washed after 72 hours on gentle cycle and line dry.

Make it Yours Tip - Use non-holiday or preprinted fabric that already has a large design on it and just cut out and glue on.

Wrapping Tip - Buy an inexpensive mixing bowl, place the apron and some spices in the bowl, wrap it with cellophane, tie a bow with fabric used from the project and you're done!

Tuesday, November 27, 2007

Tick Tock Timeless Treasure
It's quick. It's easy! You can make this adorable clock in a matter of minutes and mark it off your Christmas gift list!

What you need
Tulip® Soft Fabric Paints™ - two colors to coordinate with your fabric - one dark and one light (even though the name is fabric paint, you can use it on all your projects!)
Aleene's® Crystal Clear Tacky Spray
Aleene's® Original Tacky Glue
Wood piece with hole for clock movement or drill hole
Foam brush
Sponge
Fine line permanent pen (black)
Fabric of your choice
Craft knife
Clock movement with hands (make sure the stem is long enough to go through wood
4 wood hearts
Scissors

Here's how to do it!
1. Paint sections of wood piece that will not be covered with fabric, using dark paint color. Paint hearts same color. Let dry. Sponge lighter color of paint over painted sections of wood piece. Add dots around edges of small hearts, using permanent pen.
2. Cut shape from fabric to fit wood piece. Spray Tacky Spray on back of fabric and smooth on wood piece. Cut hole for clock movement through fabric with craft knife. Position clock in place through hole, following manufacturer's instructions.
3. Glue wood hearts in position on clock, using Tacky Glue. NOTE: Place hearts so clock hands do not scrape them.

How to Make it Yours (or a perfect for that special someone) - Make the clock extra special by picking fabric and wood pieces that speaks to you about the person. Personalize with Tulip® 3D Fabric Paints™ and you can add 3D Paint numbers instead of using wood hearts.

Enjoy!

Sunday, November 25, 2007

Thanksgiving on the Farm

What an awesome few days! My five-year-old nephew, Brandon, drew the turkey picture that is proudly adorning my brother and sister-in-law's frig. I love his 'outside of the box thinking' when it came to coloring the feathers on the turkey. You go Brandon!

We had ten sitting at the dinner table this Thanksgiving. The food was extra yummy and the weather fantastic! Just before sunset, my brother and I surprised (OK, I learned my brother CAN'T keep a secret!) our family with a hayride and then festivities in the 80+ year old barn. My parents have lived on the farm for over 50 years, so it was a special treat for them (and us kids too). The hayride got a little chilly (tip for next time - serve hot chocolate on the hayride). We had tin can luminaries leading to the barn where our desserts and hot drinks awaited us (and the napkins, cups and plates I stamped). We sat on haybales, looked at the construction of the barn (my bro had just finished the peak of the roof the weekend before) and enjoyed stories. Come to find out, my brother used to go out to the barn when he wasn't feeling well so it's a place of comfort to him. My sister and I remember pulling back the wood sliding door (it seemed awfully huge and heavy when we were young) to get out the tractor when we did our chores. My brother was already suggesting ways to make the barn festivities even better next time.


I almost forgot, my mom and I both love leaves and we found some neat 'cookie' cutters at Williams Sonoma a couple weeks ago. She actually made cracker dough, cut them out with the cutters and also cut out cheese to put on some regular crackers. Of course, I keep thinking of crafty things to do with the cutters.

I worked a little bit on a ceramic project I've been working on over the months. Pictures of that next time.

I have some EXCITING holiday projects coming up that I'll show you how to make - keep checking back!

Enjoy the holiday!
Joan
Be sure to check out other Christmas project inspiration in the archives.

Wednesday, November 21, 2007


Celebrate Thanksgiving
with plates and napkins you've stamped yourself!
Easy, Easy, Easy Thanksgiving Tableware
You can zap an entire tablesetting in just a few minutes - it's inexpensive too!
What you need
How to do it!
1. Squeeze out a small amount of fabric paint on a plate.
2. Dab cosmetic sponge into paint. Dab paint on stamp.
3. Press stamp on napkin or plate.
Taaaadaaaaa! You're done!
Make it Yours Tip - This idea can be for any occasion - Christmas, birthdays, Valentine's Day - and don't forget - every day is special - CELEBRATE!

Friday, November 16, 2007


Make Your Own Holiday Cards


I almost forgot to share my holiday cards with you. I was reminded when I received an email from Lauren today saying she received it. I got in the habit a couple years ago of mailing out my cards before Thanksgiving before everyone gets in the hustle and bustle of the holidays.

I took the picture at my parent's farm a couple weeks ago. I uploaded the image to COSTCO from the convenience of my home computer and an hour later I was picking them up. They only were 17 cents each. I purchased some blank cards at my local craft store and glued the images on using the Aleene's® Original Tacky Glue Sticks. The cards only cost me 37 cents each.

Make it Yours Tip - Did you just finish a special project? Perhaps a holiday gift or home decor item or a stocking, an afghan??? Take a photo of it in a nice setting, print it off on your computer or have it professionally printed and do like I did - make your own cards. Your cards will stand out from the crowd, you'll have had fun being creative and made something from your heart.

Thursday, November 15, 2007


For a brief moment I got to feel what it's like to be Tom Cruise or Oprah Winfrey!


I attended a huge party last night and as we walked in, the paparazzi were taking pictures of us - there were camera flashes everywhere. It was kind of a weird feeling. Our pictures will be available in the next couple days, so I'll post them when I get them.

The party was sponsored by a magazine to raise money for the local university alumni association. There were local celebrities, cheerleaders, bands and so much to do!

The evening featured lots and lots of food - many restaurants around town offered their delicious food and there was wine and more wine and I can't forget the desserts!!! We even had our palms read - she said 2008 would be less stressful - I can't wait!

Last Saturday night was another WONDERFUL party! My friend works for a posh grocery store (a true understatement) and bistro and they were celebrating their first anniversary. Over 600 people RSVP'd to the event - there was food, food, food - so much so, we were stuffed and said we wouldn't have anything else to eat, but then came a turkey that had been soaked in wine for two days (had to try that - it was fabulous!), desserts, cheeses that I'd never even heard of and huge shrimp. We even got swag bags with little gifts and a gift certificate for the store. We enjoyed music that kept our feet tapping and it's nice to have friends who know everyone in town so they introduce you to interesting people.

I'm looking forward to a quiet weekend so I can gear up for the Thanksgiving festivities with my family. My brother and I have a surprise planned for our entire family - something fun we've never done before. We're planning an old fashioned hay ride and then some activities in the 75 year old barn on the family farm. My brother is just about to finish up restoration on the barn so it looks awesome! We're getting together hay bales and hitching up the 50+ year old tractor to a trailer and we'll just bundle everybody up and take a little ride around the farm. Then, it's to the barn where we will have luminaries leading to the door and inside we'll have the heaters and candles going and enjoy hot cider and hot chocolate with nice music playing. I'm hoping to get the projector and 8mm old home movies to share with everyone too. I can't wait!

I'm also making a few presents this weekend, so I'll have some new inexpensive and quick project ideas for you next week! I'm packing a couple projects to work on Thanksgiving Day while we're sitting around - I'm looking forward to a nice, quiet day.

Keep crafting!

Joan


Monday, November 12, 2007


Creative Natural Highs

I received an email recently that really got me thinking...it was titled 50 Natural Highs. Some of the entries were...no lines at the movies, taking a Sunday drive, warm towels fresh out of the dryer, a long distance phone call from a friend, finding a $20 bill in your coat from last winter.

So, I thought - what about CREATIVE Natural Highs? Here are a few of mine...how about yours?

Joan's Creative Natural Highs
  • Watching the expression on someones face as they open the gift that I made especially for them
  • Having my five year old nephew ask if I brought something to craft with when I visit
  • Taking a pile of craft supplies and transforming them into something special
  • Loosing track of time because I'm having so much fun crafting!

Thursday, November 08, 2007

WINE STOPPER
INEXPENSIVE GIFT IDEA


I'm widdling down my holiday gift list - here's one for the wine (or vinegar) lover!

Here's What You Need
Aleene's® Platinum Bond™ 7800 All-Purpose Industrial Strength Adhesive
Tulip® Glam-It-Up!™ Iron-On Crystals™
Wine Stopper - I bought mine at Target - $2.99
Craft stick
Crayon
Here's How to Make It
1. Apply adhesive in a small area of stopper, using craft stick - the glue dries quick.
2. Pick up a Crystal with crayon - it will hold the Crystal until you place it in the glue.
3. Continue gluing Crystals on stopper until filled in.
You're done! Quick, easy, looks amazing and INEXPENSIVE!!!

Keep stopping by - I have many, many more craft projects to share with you!
Into the Jungle

With the holidays right around the corner, I've been thinking about gift ideas. I love the challenge of coming up with gifts that are just right for everyone on my gift list. I really, really, really love gifts that make an impact, speak to the person I'm giving it to, it has to be within my limited budget AND it has to be quick and easy!

With all those criteria in mind, I found these incredible monkey napkin rings at Pottery Barn - they are sooo cute and so very applicable for my friend.

Into the Jungle Napkins and Napkin Rings

Here's what you'll need
Tulip® Soft Fabric Paint™, Olive
Napkin rings
Cloth napkins
Stamp, leaf
Sponge brush or cosmetic sponge
Iron - optional

Here's what to do
1. Prewash and dry napkins to remove sizing. Do not use fabric softener. If needed, iron to remove wrinkles.
2. Dab Fabric Paint on stamp with sponge brush or sponge. Press on napkin where desired. Let dry. May be washed after 72 hours.
You're done!
Giftwrap Tip: I'm going to wrap with brown paper bag tied with raffia!
Other Gift Ideas: I'm full steam ahead into holiday gift making - be on the lookout very soon for how-to instructions on a Crystal Encrusted Wine Stopper - it's a real show stopper!, an interesting personalized photo display - you won't want to miss this! It's something you can make for EVERYONE on your gift list!, more Glade Flameless Candle ideas - all the supplies are on my kitchen table, just waiting for me to get started - and I CAN'T WAIT! Check back soon for these ideas and many other giftables.

Saturday, November 03, 2007


Making Crafts, Making Money


Well, I was surfing the web tonight - OK, I admit it, I actually typed in my name and here's what popped up - I forgot about a book I was a part of a while back.


This shot was taken in my backyard - boy, we sure had a green lawn!


The title of the book is Making Crafts, Making Money - the instructions for this project can be found at:


http://books.google.com/books?id=uVgpAE_whEYC&pg=PA47&lpg=PA47&dq=joan+fee&source=web&ots=nTQ74WFUiQ&sig=dr4CiG1RWVTTaOoUYciasqxT1x8#PPA4,M1


These projects are fantastically easy - find inexpensive base pieces and spray on the Krylon Webbing Spray and you're done. They make fantastic hostess gifts AND holiday gifts!


Thursday, November 01, 2007

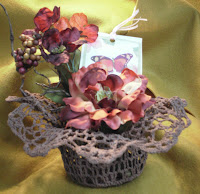
FABRIC STIFFENED DOILY BOWL


Retro is back!!! My mom and I went Christmas shopping this weekend and I was amazed to see fabric stiffened bowls in the stores! I made them a zillion years ago and they're here again.


Are you ready to hear how easy these are to create?


Fabric Stiffened
Doily Bowl

Materials needed
Aleene's® Fabric Stiffener and Draping Liquid
Tulip® Soft Fabric Paint™, Chocolate
Doily (found them at my dollar store!)
Zip top plastic bag
Bowl or something to form doily over
Plastic wrap
Embellishments

How to make it
1. Smooth plastic wrap over bowl.
2. Place doily in zip top plastic bag. Add a little Fabric Stiffener and a small amount of Soft Paint. Close plastic bag. Squish the doily around to saturate with Fabric Stiffener and paint. Add more Fabric Stiffener and paint as needed to cover.
3. Remove doily from bag and smooth over bowl. Remove excess Fabric Stiffener by dabbing it with a paper towel. Crumple plastic wrap and place in areas where you want dimension like along an edge so it's wavy.
4. Let dry. Remove from bowl. Decorate as desired.

Fill your fabric stiffened bowl with silk flowers, candy - whatever for the season. This makes an awesome thank you or hostess gift for Thanksgiving! This technique also works with fabric, napkins, handkerchiefs, etc.