Friday, December 28, 2012

New Year Inspiration

Have you seen the peel and stick quotes in stores or catalogs?  Well, here's an inexpensive way to create your own wall art in a matter of minutes.


Find your perfect quote.

Type the words into a word processing program.  Select the color and size font that fits perfect in your room.

Print it.

Cut it out.

Attach to wall with tiny amounts of stick glue so you can remove it when you want a new quote.

My walls are super textured so I knew if stenciled on a quote it wouldn't look good.  And this way too, I see I need to tweak the e a little so I can easily peel it off, apply a little more glue and be 100% happy with it.

Thursday, December 27, 2012

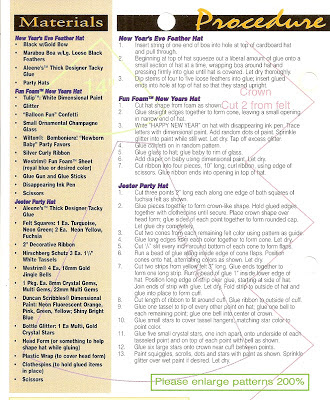
New Year's Eve Party Hats

I'm dusting off the old Aleene's Creative Living archives for these great party hats for your New Year's Eve celebrations!

Glittered Workout Wear

Whether it's New Year's Day or a regular day, look great when you're workin' out!  Heidi Borchers designed this many years ago but it still would be the hit of your exercise class!

What You'll Need
Aleene's Flexible Stretchable Fabric Glue
Glitter, washable
Chalk pencil
Leotard
Belt, if desired 

How to Make It
Prepare the Leotard
Wash and dry the leotard following manufacturers laundering instructions.

Pattern
Draw two sizes of stars and cut out.  Place on leotard and trace with chalk pencil where desired.

Apply Glue
Cut a tiny hole in glue tip. Trace stars with glue. Sprinkle on glitter.  Let dry.  Remove excess glitter.

Care of Leotard
Do not wash for at least a week to make sure glue cures. Treat as a fine washable by turning inside out and washing in a gentle cycle.  For best results, hand wash and hang to dry.

Saturday, December 22, 2012

Grandma's Linen Pouches

Need a last minute wrapping idea or one that has a special touch?  These pouches are perfect for slipping a gift inside and give a little bit of yourself or grandma too.  Made from old linens, this project is sure to be cherished by one and all.

Sunday, December 02, 2012

Tissue Paper Art

Heidi Borchers, the daughter of Aleene from Aleene's Creative Living Television Show and Magazine taught a group of us how to make this really cool graffiti paper using tissue and paint!  This frame is going to be a gift for my nephew - think a 17-year-old will like it?

Monday, November 26, 2012

Michaels Trimmings for the Christmas Tree

I created these super easy ornaments way back in 1997 and they're still in vogue today.  You'll have plenty of amazing trims to choose from at Michaels and everything else is there to create stunning trimmings for your tree.


Monday, November 19, 2012

Krylon & Artistic Wire Dressing Table Accessories


Another favorite project from my past from Aleene's Creative Living.  Check out the bargain bin or dollar stores for brushes, mirrors and perfume bottles to decorate in your favorite colors.

Tuesday, November 13, 2012

Aleene's Archive Decoupage Footstool


I so loved making this project!!!  (Looks like I made it way back in 1997!)  Find a paper print (napkins, gift wrap paper or a poster will do) and apply away.  Use your favorite high-quality acrylic paints to match your papers and this will be ready to accent your livingroom tonight.

Wednesday, November 07, 2012

Aleene's Vintage Instruction Sheets

  
I was doing a little closet cleaning and ran across a HUGE binder filled with 350 (yes, I counted them!) Aleene's instruction sheets.  It's time to share these amazing projects with others so here's your chance to be the proud owner of years of Aleene's Creative Living history.  The projects are holiday and everyday so there's certainly a lot of crafting territory covered! Please contact me if interested and we can iron out the details.


Fused Glass Daisies & Cheese Plate

  
I have so enjoyed my fused glass classes / workshops - this meant stepping outside the box and trying something new (and exciting!)

This cutie dish will make its way into my newly established cobalt blue bathroom.
  
A few of us in the open workshop realized we were all making the same thing inspired by a local glass shop.  This will become a cheese plate for a very dear friend.  I'll add bumpers on the bottom and I bought a little cheese knife that I'll glue on some little glass pieces I fused.  This piece was totally made from scraps of glass.


What a great experience - I highly recommend trying something out of your comfort zone and fused glass.

Tuesday, November 06, 2012

Aleene's Vintage Decoupage for Your Bathroom

It's about time for all those visitors for the holidays and just in time are these suggestions to fresh-up your facilities. Use wrapping paper, napkins or a poster instead of the decoupage papers.  It's quick, easy and will be an expression of you!


Monday, November 05, 2012

Cobalt Blue Beaded Curtain

I've had an itch to use some of my beads and taaadaaa, here are my creations - super simple!!!

Tie a couple of knots in the end of a piece of fishing line.  String on beads, tie a knot near the top bead. Continue stringing on beads and knotting.  When you get to the desired length, leave some excess and tie to a curtain rod.  BTW - the sunflower came up as a volunteer in my garden!

I also made this candleholder that I bought a while back at Oriental Trading Company.

Friday, November 02, 2012

Fused Glass Poppy

I thought making this piece was going to be simple but the perfectionist in me didn't quite see it that way.  I started with two large circles of glass - one clear and one swirly.  They were fused in a kiln then I chopped away at the edges to give them curves.  I added frit (tiny pieces of chopped up glass) along the edges, added tiny dots cut from canes of glass and bent some stringers (thin, thin glass rods) for the middle.  I thought I was going to make this into a birdfeeder but it's just too pretty so now it's going to find its home on my coffee table.  This was our last week of open workshop but I managed to get two projects done so I get to anticipate for a whole week what they'll look like when they're taken out of the kiln.  The circles were cut from a 12" piece of glass so the bowl is larger than it looks and it's dimensional too!

Wednesday, October 31, 2012

Tuesday, October 30, 2012

Last Minute Halloween Costume Ideas

Halloween snuck up on you, so now what?

Here are some spooktacular ideas to save the day from things you have around your home!

  • Flower Child - Dig out that tie-dye shirt, add a garland of flowers in your hair and you're an instant Hippie, Flower Child or just really cool hipster
  • Julia Child - Put on an apron, tie kitchen items to a large collander or strainer (that's your hat) and carry a cookbook or tuck some veggies coming out of your pockets
  • Artist / Crafter - You know the favorite shirt you wear when you're being creative?  Wear that (drops of paint and all), put a few brushes in the pockets and go! Wear some earrings you've made too!
Don't sweat it, if you don't have anything to wear, put on a Fall color blouse, some cute earrings and go as your busy self - people will understand!

Wednesday, October 24, 2012

Aleene's Glue

About a month ago I received a notification on facebook that someone recognized me in a photo Tiffany Windsor posted.  It's embarrassing, but I had to ask the person to refresh my memory as to who she was.  Turned out she was a former co-worker at Aleene's and as we got more reacquainted we found out we both live in the same small town about an hour from where we worked. 

Last night we attended a Meet Up group here in town and saw each other for the first time in 17 years!!!  She came over for lunch today and we caught-up, brainstormed and had a great time.  She brought me these delicious leaf shaped cookies and attached a wonderful gift tag that reads: 
glue: something that binds together

What a lovely and thoughtful gift!  Thanks Carrie!

Tuesday, October 23, 2012

Make a 16th Birthday Plate

Sweet 16 Party Ideas

Turning Sweet 16 is always a time to remember so make an extraordinary one-of-a-kind keepsake by having everyone at the party sign their names on a tissue heart that you later use to decorate this so sweet plate.

What You'll Need

  • Tissue paper (pink and white pin stripe, white, medium yellow, silver, fuchsia, light fuchsia)
  • Pencil
  • Scissors
  • Scissors (decorative edge)
  • Permanent Pen (black, wide and thin)
  • Paintbrush (wide)
  • Platter (clear)
  • Glue (clear)

Have guests sign their names on light fuchsia hearts using thin permanent pen.

How to Make It

1. Draw and cut out designs from tissue, using photo as a guide for color. Cake - cut a rectangle from pin stripe. For icing on top and bottom of cake, cut two pieces of fuchsia tissue slightly longer than cake rectangle x 1/4" wide, using decorative edge scissors. For center of plate, cut a circle the diameter of platter center from light fuchsia tissue.
2. Place cake pieces on tissue circle for placement.
3. Write desired saying around tissue circle, using wide permanent pen.
4. Brush a light coat of glue on tissue circle where cake will be placed. Place cake over glue. Lightly brush glue over cake. Add candle, flame, 'icing' and cake plate. Let dry.
5. On back of platter, brush a mediuim coat of glue in center area where tissue circle will be placed. Place tissue circle over glue with right side down. Brush glue over tissue from center out to edges.
6. For edge of platter, brush glue where hearts will be placed on back of platter. Place hearts right side down into glue. Brush glue over hearts.
7. Tear pink stripe tissue into small pieces. Brush glue over remaining exposed glass. Place pink stripe tissue pieces over glue, slightly overlapping until all glass is covered. Brush glue over tissue. For edge of platter, fold excess tissue under or after dry, cut excess.

NOTE:  Do not submerge the platter in water - clean with a damp sponge.


Tuesday, October 16, 2012

Floral Stickers

How to Make Stickers

These stickers are great way to accent stationery and you make them yourself!  This is a great way to preserve / use a special bouquet you've received!

What You'll Need

  • Dried Pressed Flowers (You can even take semi-dried flowers, put them between paper towels on a wood cutting board and iron them dry)
  • Laminating Plastic or Clear Contact Paper
  • Scissors
  • Permanent Pen

How to Make Them

1. Draw desired shape (heart, circle, etc.) on paper side of laminating plastic, using permanent pen.
2. Cut out.
3. Remove paper backing from laminating plastic.
4. Arrange flowers on slick side of laminating plastic.
5. Press sticky side of laminating plastic over flowers.
6. When ready to apply, remove paper backing and stick to envelope or stationery.


Tuesday, October 09, 2012

How to Make a Welcome Mat

Adoorable Decorated Doormat


It's Fall, so that means the holidays are right around the corner so make your guests feel extra-special with a custom decorated welcome mat.  These make inexpensive holiday gifts too!  Personalize for each person with a stencil that fits their personality.  You can even make your own stencil design with Contact Paper.

What You'll Need
Doormat
Acrylic Paint
Stencil
Sponge
Spray Adhesive

Plate

How to Make It
1. Spray adhesive on back of stencil, following manufacturer's instructions.
2. Press stencil where desired on mat.  
3. Place small amounts of paint on plate. Dab sponge into paint. Dab paint into openings of stencil until desired look is achieved. Wash out sponge and move onto another color. Continue stenciling. Let dry. NOTE:  If using reverse image (see angels in picture), wipe wet paint from stencil and apply adhesive on reverse side.

To make custom stencils, place design under clear Contact Paper. Trace with permanent pen. Cut out.  You won't need the spray adhesive. Start with step 2 above.

Thursday, September 27, 2012

Recycled T-Shirt Notebook


I seem to be on a notebook kick, but after all it is September and we're back in school!

What You'll Need


Notebook
Fabric large enough to cover notebook
Fabric Glue
Spray glue
Newspaper
T-shirt
Scissors 
Trim
Silk flowers
Pencil
2 Decorate Papers large enough to cover each inside of notebook


Step 1

How to Make It


1. Place fabric on work surface, right side down. Place notebook on fabric. Trace around notebook with pencil. Cut fabric 3/4” wider than lines.
2. Working outside, place newspaper to protect surface. Spray glue on back of fabric. Immediately place sprayed fabric on work surface and place back of notebook on fabric. (step 2a) Turn notebook over and smooth fabric in place with hands.
Step 2
Step 2a
3. Flip notebook to inside and smooth excess fabric to inside. Clip corners and ease in excess fabric.
4. To cover inside of notebook, trace one side of notebook on decorative paper. Repeat on second piece of paper. Cut out.
Step 3
5. Spray back of one piece of paper with spray glue. Smooth into place on inside of notebook. Repeat for second piece.
Step 6a
Step 6b
6. Cut sleeve from T-shirt. If desired, cut smaller to fit notebook. Glue raw edges together (step 6a). Glue trims along raw edge (step 6b). Let dry. Glue on notebook leaving top edge open to use as pocket. See finished photo for suggested placement. Glue on silk flowers. 

Saturday, September 22, 2012

Costco International Photo Contest


 I did it, have you?
Time is running out to enter your photo in the Costco International Photo Contest.  The deadline is September 30, 2012.  Better hurry, it took me quite a while to pick 'the winning photo' from my archives!
Happy Fall!

Thursday, September 20, 2012

Eye Glass Jewelry

What do you do with broken eye glasses?  Toss them? Put them in a drawer and find them again ages from now?  Nope, you create personalized jewelry with them!


What You'll Need
Eyeglasses
Glue - Decoupage or any glue that dries clear
Napkins, Tissue Paper or Fabric
Gold or Silver Pen - optional
Pin Back or Leather Necklace
Words printed on your printer
Pliers - optional
Pencil
Scissors
1/2" wide or larger paintbrush

 How to Make It
1. If desired, remove lens from frame. (Note:  The necklace was made leaving the lens in the frame, cutting the frame at the center and after decoupaging it was glued to the leather necklace.)
2. Print desired word on printer to fit inside lens. Cut to desired size and shape.
3. Place lens on tissue paper, napkin or fabric. Trace with pencil.  Cut out on inside of lines.
4. Brush glue on back of lens. Immediately place words and then tissue, napkin or fabric piece over it. Smooth with your fingers. Brush glue over back. Let dry.
5. If desired, apply gold or silver pen along edges of lens.
6. Glue pin back on back of lens or glue frame to necklace. Let dry.

Wednesday, September 19, 2012

Doughlicious Fun!!!

It was such a fun day!!!  I had a doughlicious time visiting the twenty-six fifth graders at the elementary school I attended.  We had a great time making marbles and leaves using dough created from cornstarch, glue and acrylic paint.

For tons more ideas to create with the dough, check out the Make Healthy Fun! book under the shopping section and if you just can't wait to receive the book in the mail go to http://www.lulu.com/shop/joan-martin-fee/make-healthy-fun/ebook/product-16790209.html and download the ebook!


Dough Recipe
1 cup cornstarch
1/2 cup white glue
Acrylic paints - desired colors

Place the cornstarch and glue in a ziptop bag.  Smoosh until mixed.

If you want to make several colors, divide the dough and place each in a clean bag. Add a few drops of acrylic paint and guess what?  You get to smoosh again until it's mixed.

Marbles - Form a ball. For the swirls in the marbles, make very small 'snake' shapes and press into the ball.  Roll until the blended in.

Leaves - Roll green dough into a ball and flatten on wax paper with your hands or use a rolling pin.  Press cookie cutter into the dough. Remove cookie cutter.  Make veins with a toothpick.

Let dry.  Depending on the humidity, it make take a couple of days.  If the marbles start to flatten on the bottom, roll again.