Saturday, December 31, 2011

New Year's Confetti Hot Dog Recipe

No matter if you're a kid or a kid-at-heart, you'll love this incredibly fun twist on a normal hot dog - make them healthier too with turkey or chicken hot dogs and reduced fat crescent rolls.


Confetti Hot Dogs
for more kid-friendly recipes and craft projects visit our sister blog www.MakeHealthyFun.blogspot.com

What You’ll Need
  • Turkey or Chicken Hot Dogs
  • Reduced Fat Crescent Rolls
  • Food Coloring
  • Baking Sheet
  • Oven
  • Plate
  • Paintbrush or Something to Apply Dots

How To Make It!
1. Open package of crescent rolls. For each hot dog, use one crescent roll.
2. Roll a crescent roll between your hands or on work surface into a snake about ¼” wide.
3. Wrap around hot dog leaving space between. Place on baking sheet with the ends of the crescent facing down.
4. Place a drop of each color of food coloring on a plate.
5. Dip the non-bristle end of a paintbrush into one color of food coloring. Dot food coloring on crescent roll wrapped around hot dog. Dip paintbrush in food coloring and dot on again. Clean brush after changing each color.
6. Cook following instructions on crescent roll package.

Tons of other recipes and ideas are available in the 120-page Make Healthy Fun! book - check out the shopping page at the upper right for details.

Wednesday, December 28, 2011

Christmas

I got my nephew's a really cool Christmas gift - Air Swimmers.  A friend sent me a video months ago about them and I was so intrigued, I ordered it.  Then, I see it's one of the top gift items at Toys r Us.  It's huge, fun and really looks like it's swimming in the air.
I've had the idea for this cake for a couple of years and thought this was the year to try it out.
This was kind of a combo gift for my sister.  My parents were both rural mail carriers and we have this 'thing' about mailboxes.  I had my brother cut holes in the mailbox (not an easy thing) and then I gave my sister tons of succulents to choose from (from a friends garden) and she planted it.  My brother got into the fun and made himself a succulent garden and then my mom even found a pot and made one.  My sister is going to add a large 'cabbage' succulent in the front.  Can't wait to see the plants grow and spread to hopefully cover the mailbox.
I was headed out of town and decided to go through downtown Lemoore - I love small town America where there's still a Christmas tree in the center of town and decorations hanging over the street!

Monday, December 19, 2011


Here's a fabulous way to keep the kids busy while they wait for holiday festivities or any day of the year!  And, it's a recycling project too!  It uses #6 plastic containers - and things from around your home.
I Shrunk the Plastic

Materials Needed
Cookie cutter, plastic or other plastic item for hanger
Wire or fishing line
#6 clear plastic containers
Plastic decorations: beads, toys, etc
Permanent pens
Scissors
Hole punch, small
Cookie sheet
Oven mitt
Candle
Paperclip
Plastic ring
Glue
1” wide braid
Oven or toaster oven

Directions

Draw design on clear plastic with permanent pens. NOTE: The designs will shrink about 50% of the original size. Cut out. Punch holes in top and bottom. Preheat oven to 300 degrees. Place clear plastic designs on cookie sheet and place in oven until they lay flat. This will only take a few minutes. Remove from oven using oven mitt. With adult supervision, make holes in plastic decorations by heating paperclip in candle flame. Insert into plastic to make holes. Thread beads, shrink plastic designs, toys, etc. on wire, knotting below item to secure. Make holes around bottom of cookie cutter edge with hot paperclip. Thread decorated wire in hole and knot. Repeat for all wires. Make three evenly spaced holes around top of cookie cutter. Cut three 12” pieces of wire. Insert each wire into a hole and knot. Gather wire at top and tie around plastic ring adding a bead, if desired.

Saturday, December 10, 2011

Kitchen Transformation

Kitchen CHAOS!!!  My cabinets haven't been loved for 32 years but I have my fingers crossed that the Rust-oleum Cabinet Transformations will help me out with three EASY steps and make them beautiful!  I've deglazed (or in my case, degrossed them) and tomorrow comes the painting step.  I'll post more photos as I progress...

Sunday, December 04, 2011

California's Central Coast

Morro Bay Lighted Boat Parade


Ragged Point
One day it's 80 degrees and the next there was a shark sighting...

Friday, December 02, 2011

Decorate Your Holidays with Antique Postcard Images

Digital images are a fabulous way to create inexpensive decorations for your home this holiday season.

All you have to do is print off an image, punch two holes about 1/2" apart, string through some ribbon and tie to your tree, a garland, down your staircase - share you ideas!  These vintage holiday and everyday images are from my great aunt's collection that are available on etsy.com

Sunday, November 27, 2011

Tuesday, November 22, 2011

Repurpose an Old Baby Crib

Check out these cool ways to repurpose old baby cribs on the Encore Baby Registry website. I transformed my nephew's baby crib into storage pieces and am honored to be included in the article.
http://www.encorebabyregistry.com/blog/repurposed-crib-projects-upcycle-your-old-crib-out-of-the-landfill

Thursday, November 10, 2011

Vintage Postcards Candle


What could be easier?  This beautiful candle created from a digital image of a vintage postcard would make the perfect hostess gift or a great way to bring the holidays to your home.
Colorful Candles
Apply double-sided tape on back of image. Place on candle. Glue on red and green crystals. Let dry.  That's it!  How cool is that?  Vintage postcard images are available at:  www.etsy.com/shop/joanmartinfee

Saturday, November 05, 2011

Vintage Postcard Crafting


My family has amazing postcards that are over 100 years old that belonged to my Great Aunt Myrtle in Iowa.  I made this charming changeable vase with digital images of vintage postcards - here's how I did it:
 
Cha, Cha, Changeable Vase
If you don't have your own vintage postcards, digital images are available at http://www.etsy.com/shop/JoanMartinFee - two different sets of three are available for ALL your crafting projects - they're scalable too so you can make them just the right size for your projects. You also receive an inspirational instruction sheet filled with holiday decorating and gift ideas.

Layer red and green paper behind image cutting out with decorative edge scissors. Glue together with glue stick. Glue to piece of red paper that fits in vase. Place smaller vase or jar inside larger vase. When the holidays are over, remove the Santa image and replace it with an everyday image.

Monday, October 31, 2011

Aleene's Fusible Web

LOOK WHAT I FOUND!!!

An entire bolt of Aleene's Fusible Web.  I made many wonderful things with Aleene's Fusible Web over the years - quilt appliques, baby items, I even fused fabric to paper to make cards.  Well, it's time to make more room in my craft room.  Anyone interested? Drop me an email at craftproducts@yahoo.com and we can talk particulars.
 
16" x 50 yards - yup, 50 YARDS!!! Easy to follow iron-on instructions included.


Happy Halloween!!!!

Hello my pretties!

I have on my jack-o-lantern socks, ghost earrings and an orange blouse.  Let the fun begin!

Sunday, October 30, 2011

Monarch Butterflies

The Monarch butterflies are back and I'm trying to get the perfect shot for a mobile...

Monday, October 17, 2011

Vintage Christmas Postcard Images

Are you ready for the holidays?  I've been busy crafting away using digital images of vintage Christmas postcards that belonged to my great aunt!  We're talking 100+ years old!  You can make everything from gift tags, embellish candles, make gift bags, create washable gifts (t-shirts, napkins, kitchen towels, etc., etc.), jewelry, changeable vase, holiday cards, holiday planner, ornaments and more ornaments!!! 

I'll be posting a new project every couple of days so keep checking back for instructions on how to create with these beautiful postcards.  BTW - it's NEVER too early to start creating for the holidays.

Joan

The postcard images are available at: 
http://www.etsy.com/shop/JoanMartinFee

Tuesday, October 04, 2011

Vintage Postcard Crafting

I'm listening to holiday music in October - before you think I've totally lost it - I'm making some Christmas projects using my great aunt's vintage holiday postcards.  My family has tons of her old postcards - it's a hoot to read these tidbits of the past and see the wonderful stamps and greetings.  I'll post my creations soon!!!  BTW - I'm not using the originals, I'm making copies. 

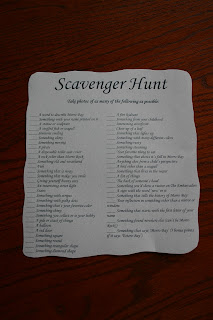
Photo Scavenger Hunt Ideas

I'm hosting a photo scavenger hunt and it was so much fun coming up with a list of items the attendees have to find and photograph.  I made it specific to the area we'll be.

I printed the list out on some old looking paper, rolled it up, put on a sticker (it's actually a self-adhesive address label that I printed on) and tied it with raffia for a kind of scavenger / pirate look.

Can't wait for the big event and see how everyone does...pictures this weekend!

Autographed Baseball

My friend, Marie, added this photo from her grandson's baseball themed birthday party - it's an autograph ball station, where she had a sharpie on the tray to sign the baseball and a candle holder she used as a pedestal for the 'theme ball'. The radio frame has their favorite Dodger announcer, Vin Scully in it!

Sunday, October 02, 2011

Baseball Birthday Party Ideas

Check out my friend Marie's, awesome baseball party theme decorations for her grandson's first birthday.  Marie is always whipping up something creative - she teaches amazing projects at Quilter's Quarters in Hanford, California.  Check out her upcoming classes at www.quiltersquarters.net

Marie's last name is Wilder - that's why it says Wilder Field on the scoreboard!  Cute isn't it?
 Love the banners!!!
 Marie tells me the centerpieces were less than $8 each - most expensive item - the pail.  The words to Take Me Out to the Ball Game song are printed on the other side! 

Love the cake! 

Thanks for letting me share your awesome ideas, Marie!!!

Friday, September 30, 2011

Transform a Birdbath into a Succulent Garden

Birdbath gone bye-bye...hello new succulent garden!

I bought this birdbath a couple of years ago and had high hopes of listening to gently flowing water and jubilant birds!  (it had a solar powered water feature in the center)  Some days (lately quite a few days we don't see the sun) so I became a little disappointed in the water feature and no birds...the weather took its toll on the poor thing and it just sat in my un-loved backyard for quite a while.  Transformation time!

See the other treasures in the background I have to decorate my backyard? 
 The birdbath was made of resin or some kind of 'soft' material (read that as not concrete) so holes were drilled into the base for drainage.
Standing at the ready...I placed some rocks in the base then added some cactus / succulent 'potting mix' available at a garden store (or you can mix 50% regular potting soil with 50% perlite / sand).
I can't wait for it to fill in a little bit.  I'm looking in my stash for just the right miniature to add interest.  Meanwhile I added some rocks that I found in my front yard.

 
A friend gave me all the succulents.  I can't wait for them to grow so I can share cuttings with others.

Thursday, September 29, 2011

Artistic Wire Spooktacular Spiders

Check out these fun spiders I made ages ago for Artistic Wire (I must give credit to Paul Fee for the idea).  I so remember making it!
Go to www.artisticwire.com then go to projects, then holiday and click on Spooktacular Spiders - they're so fun!

Wednesday, September 28, 2011

Knitted Bus


Check this out!  A knitted bus wrap by Magda Sayeg.  There's an article in the October 2011 More magazine that tells all about it.  Pretty cool!  Can you imagine how long it took???

Saturday, September 24, 2011

Garden Ideas

Garden Before (and after) Photos

This is looking down from the deck off my kitchen.
There should have been a before, before picture - in the spring my nephew weedeated (is that a word?) my backyard - it was covered with weeds - all that rain last winter sure brought them on!

 The garden is still in process, but I love the six-pack of tomatoes I got at Home Depot - each plant was a different kind of tomato.
 Green beans - I had a big serving from them this week.
 Can't wait for the sugar snap peas to come on!
The mailbox will be transformed soon - no details quite yet, it's going to be a Christmas present...
There was part of my dinner.

More pictures soon of my other garden projects including transforming a birdbath into a succulent garden, the mailbox and I have a child's headboard and two sets of folding doors hanging out back there waiting for some lovin'.

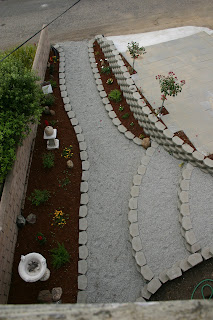
The Front Yard Renovation

 I live on a hill and parking (even walking) is a challenge.  So here are some before and below are after photos.  I think it took us three LONG weekends and I still am waiting for an orange tree to go outside the bottom window then I'll add some Portulaca's (something we had planted in front of our house when I was a kid).  Oh, I almost forgot to mention, the yard had not been loved for 32 years!!!
Nasturtiums were EVERYWHERE and I'm battling them even with tons of mulch in the new flower beds.
 Looking down from the second story.
In process - I think we had 5 'yards' of fill dirt / sand brought in.
Stepping stones and retaining wall blocks await their new home.
Here's my bro.  He manned the Wacker Packer that took all the dirt and compressed it to make a new parking area.
 We moved a TON of dirt - one shovel full at a time!
 Making headway...

The project transformed as we went along - the 'steps' here were never part of the original plan but neither was putting the parking area where it's at.
Done...it was fun picking out plants (with the help of my sister) to finish off the project.

 My new path lets me bring my trash out to the street with ease - we have clay, sticky, yucky soil so it was always a challenge when it rains.
The hole is ready for my orange tree - it's supposed to be in next week.  I need to work on the steps to the faucet before I plant Portulaca's.
 Done...
 Done...well, almost.
 My front door ushers in fabulous fall!
View from the second story.