Thursday, February 27, 2014

What to do with an Old Quilt

Project Save Great Grandma's Quilt - The Finish

 Drum roll, please...
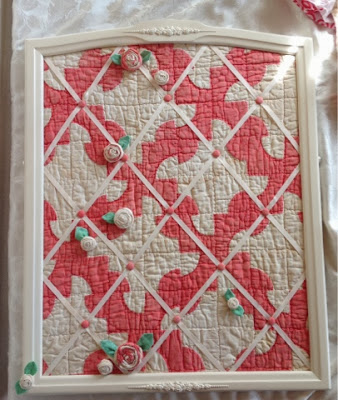
I started this project a couple of weeks ago as a special birthday gift for my mom.  It started as a very tattered quilt that her grandmother gave her back in the 50's or 60's.  It's been in my parent's closet since it isn't usable and every once in a while we pull it out and say we should do something with it.  We (my sister, mom and I) made large flower pin cushions (see below) for thirteen cousins recently but my mom wanted a larger piece.  She found an old mirror frame out in a shed and decided she wanted a memory board made using the quilt. Since her birthday was coming up, I offered to make it for her.  Life got in the way but I finished it today - I'm going 'home' tomorrow for a big family celebration - three family birthday's!
I LOVE this!  It turned out better than I expected!  I made rolled roses from strips of the quilt and dyed some of the quilt backing for the leaves.  The rolled roses are placed to cover up the big holes and one on the frame to cover up a big ding.  Almost forgot, I covered the buttons with the quilt fabric too!


Rolled roses hid the holes

Gravity Space Shuttle Cake

Astronaut Cake


I was invited to an Oscar party on Sunday and asked to bring a dish that represents my favorite movie.  Well, I have to admit that I didn't see Gravity (the previews looked too intense for me!), I still thought this space shuttle cake idea would be great!

The instructions are at this link commemorating the last shuttle launch
http://expressyourcreativity.blogspot.com/2011/07/space-shuttle-astronaut-cake.html

Wednesday, February 19, 2014

Mixed Media Madness Workshop


Mixed media is so fun!  There are no rules and you have access to Joan’s massive treasure chest of craft supplies to decorate three wood nesting boxes.  Whether your heart desires feathers, beads or metal trimmings, you’ll be in creative heaven searching for just that right trinket.  Experiment and let your creativity soar with a little of this or a lot of that and before you know it, you’ve created masterpieces for special gifts or as a beautiful accent for your home. 

Mixed Media Nesting Boxes Workshop 

Tuesday, March 25th

6:30 – 8:30 p.m.

Los Osos, California (just a few minutes from the happiest place in the US - San Luis Obispo)

$50 (everything is included in the workshop, just bring YOU!)
More details can be found at  www.CreativeMeTime.com

Shrink Plastic Frame Workshop

Shrink Plastic Heart Frame Workshop

Wednesday, March 12th
6:30 - 8:30 p.m.
Los Osos, California
$30 (all supplies are included)

My passion for shrink plastic started when I was a kid and we lived ten miles from town without much to do on a farm, so being creative became an integral part of my life.  I took that passion and created many, many, many shrink plastic projects on the Aleene's Creative Living Television Show.  So many, in fact, that Tiffany Windsor, the host, dubbed me 'The Queen of Shrink-It'.  My passion continues today and I'm excited to be holding this workshop at Heidi Borcher's Studio where I'll let you in on all the shrink plastic secrets and show my archives of projects.

Amp-up a plain frame with colorful hearts made from shrink plastic.  Remember playing with Shrinky Dinks or Aleene’s Shrink-It?  Never heard of shrink plastic?  Either way, you’re in for a treat. Shrink plastic starts as a thin sheet, you draw on it, paint on it, print on it - you get the picture.  Then you get the fun of watching it shrink in the oven.  It shrinks in just a few minutes to 60% of original size to the thickness of a nickel.  Joan will show samples of other uses since it’s great for jewelry, cake decorating, home décor and kids’ projects.  Everything’s included in the workshop to create an 8” x 10” frame.  Come join the fun on the beautiful Central Coast just north of San Luis Obispo!

Sign-up at www.CreativeMeTime.com

Sunday, February 16, 2014

Saint Patrick's Day Shirt & Earrings

I had such a fun time getting ready for Saint Patrick's Day using the EZScreenPrint product.  Create the design you want from graphics, drawings, pictures, etc.- that's what makes this product so neat - you can totally customize whatever you want!  Once you have your artwork it only takes 60 seconds exposure to the sun to make your screen!

I wanted some cute earrings to match my shirt, so I stenciled on shrink plastic that's for use with ink jet printers.  Right after I applied the paint, I placed a paper towel over the paint and gently blotted it.  If you don't, your paint will get kind of furry looking and we can't have that!  Follow the instructions on your shrink plastic to shrink. For those who have never used shrink plastic (I have adored shrink plastic since I was a kid) you do your image on the plastic, put it in the oven and it shrinks about 60%, gets the thickness of a nickle and hard.  Great for making cupcake picks, earrings and tons of other projects.  Be sure to punch a hole at the top before you shrink the plastic!

Ready to try screen printing?  Get started with a 15% off discount - just use joan15 when you're checking out and there's no minimum order.   www.EZScreenPrint.org  Check it out!

Wednesday, February 12, 2014

Creative Me Time Retreats & Workshop for Women

Mosaic Mirror Workshop
Featuring Heidi Borchers
Saturday, March 29th
Los Osos, California  
 www.CreativeMeTime.com
Mirror in progress


Our first Creative Me Time event features Heidi Borchers who was born into the crafting industry. As the daughter of Aleene Jackson, America's beloved "Mother of Crafting" and the inventor of Aleene's Tacky Glue, Heidi spent many of her childhood leisure hours in her mother's shop, gluing, creating, and learning. By the time she was a teenager, Heidi had become an accomplished artist, as well as an inventive designer.

A studio in the seaside town of Los Osos, California, is home to a sea of materials, finished designs, and works-in-progress. Hundreds of containers full of buttons, beads, trinkets, ceramic cookies, tiles and baubles await you for this project. The studio is also a classroom and store where Heidi will be holding this workshop.

Come explore the world of mosaics and learn Heidi's super easy and fun techniques.  Enjoy a day of Creative Me Time with fun ladies, a yummy lunch and take home your finished mirror!

Learn about Heidi's workshop and other retreats and workshops at www.CreativeMeTime.com

Monday, February 10, 2014

Save Great Grandma's Quilt - Almost Done

Trying to use every last piece of the quilt.  The worn spots will be covered with folded fabric roses that I made from the scraps of the quilt.


I covered buttons using scraps of the quilt.

Shrink Plastic Chandelier

What do you think?  I saw this in a magazine and my creative brain said - I can make that from shrink plastic and other baubles.  It will have to go on the back burner for the moment while I finish Save Great Grandma's Quilt project...

Save Great Grandma's Quilt - Buttons

Using every scrap of the quilt - covering buttons!  

Sunday, February 09, 2014

Project Save Great Grandma's Quilt

It's coming together!  Laying out all of the components before I do any gluing. In my quest to use as much of the quilt as possible, I made rolled roses from the backing and the really bad parts of the quilt top. The roses hide really worn parts of the quilt - win, win, win!   Think I'll add some light green leaves and, of course, something to tack down the ribbon at each X.  I forgot to mention the frame is an old mirror mount my mom found out in the shed. We're finally having awesome rain so painting the frame will have to wait until next week. Upward and onward in love!

Saving Great Grandma's Quilt

I've gathered my supplies and now it's time to dive in and start cutting, gluing and creating a way to display my great grandmother's quilt.  It was in really bad shape and had been my my parents closet since the 50's or 60's.  It's time for it to shine again !

Saturday, February 08, 2014

What to do with an Old Quilt Part 2

I'm off to Michaels this morning, with my 20% off coupon on my phone, for supplies to create my mom's birthday present using part of my great grandmother's quilt.  The quilt was given to my mom back in the 50's or 60's and was in terrible shape.  We made stuffed flowers for all of our cousins recently but have some leftover pieces.  So, that's my fun for today - save the quilt and make a memento for my mom.  Fingers crossed, I'll post pictures of the finished project this weekend.

Thursday, February 06, 2014

Creative Me Time Women's Retreats & Workshops

www.CreativeMeTime.comI'm very excited to announce that Creative Me Time is working with very talented artists and designers from the craft industry to bring you amazing women's creative retreats and workshops.  Come join us on the beautiful Central Coast of California near San Luis Obispo to learn from experts on mosaics, mixed media, scrap booking and so many more!  Check out the Creative Me Time website and sign up for the newsletter to receive the latest info on all of the happenings.

The first workshop features Heidi Borchers, the daughter of the Queen of Crafts, Aleene, the Tacky Glue founder.  Come join the fun to learn easy mosaic techniques by making a beautiful mirror.

Saturday, February 01, 2014

What to do with an Old Quilt

Great Grandma's Quilt

Today, we are honoring my mom's sister who passed away several months ago.  Since all of the cousins are gathering together we thought this would be a good time to finally share great grandma's quilt.  My mom received it back in 1968 when she passed and it was in pretty bad shape back then.  It's had a home in various closets over the years and my sister, mom and I have talked many times about finding a way to preserve it and share it with other family members since it couldn't be used as is.      

At Christmas we finally took the plunge and cut the quilt into circles and sewed on plain fabric for the backs.
My sister and I met one evening to stuff the circles, sew on the buttons and wrap the thread around them to create a wonderful keepsake.
So, great grandma's beautiful quilt is now preserved and shared with all of the cousins to be cherished throughout the generations to come.

Sunday, January 26, 2014

Shrink Plastic

I saw this pretty blouse at Macy's and it was pricey.  Dare me to try it from shrunk plastic?

Queen of the Day

Here she is...not only the Queen of the Day but she's the Queen of Crafts.  We gathered to celebrate the 90th birthday of this amazing lady, ALEENE!  

Aleene's Family

Here's the fam minus daughter Candace.  

The Aleene's Crew

It was awesome catching up with old friends!

Joan Martin Fee and Pattie Wilkinson

Got in some Pattie hugs and yes, my necklace was made from shrink plastic!

Julianna Hudgins and Pattie Wilkinson


The ladies enjoying the party.

Friday, January 17, 2014

Butterfly Tiara

I love, love, love butterflies!!!


I created this tiara from a photo I took on a recent outing.  I printed it on hard plastic so it will become a cherished heirloom for many, many years.  It's now available on my butterfly etsy shop. www.etsy.com/shop/ButterflyGiftShop?ref=si_shop

Gift Basket

Neighborhood Gift Basket

My neighbor has an amazing lemon tree and every couple of months I am gifted a bag of lemons.  I too give them away, bake with them, slice and freeze them, etc.  Before Christmas I taught a Gifts from the Garden class and created Limoncello using my neighbor's lemons. 
 When the last bag arrived about Christmas time I made my neighbor and his wife a batch.  There are many recipes on the internet so for my class, I made a quick version (5 days) and then a longer version (about a month).  The ladies in the class said the quick version was stronger and the longer batch more mellow.  I let this batch ferment for almost two months. 

Being the crafter that I am and getting back into my love of shrink plastic, I created a quick label using some clip art I found on the internet, added their names, printed it off and shrunk it.  If you're not familiar with shrink plastic, it starts out very thin and when you place it in the oven it shrinks in about five minutes to the thickness of a nickel and very hard.  Perfect for jewelry, gift tags, cupcake picks, etc., etc.  I LOVE it!
 The tag turned out great!  Follow the instructions on the shrink plastic package and you'll get good results.
 In addition to the Limoncello, I made this a 'Harry & David and Neighborhood' basket.  I was given a box of Harry and David pears so I added in some of those, I included some pickled green beans from my garden, an avocado from a neighbor's tree, an amaryllis from my yard and some Rosemary and Lemon Cookies made from my neighbor's lemons and rosemary from another neighbor's yard.

My neighbor was so surprised when I took over the basket last night. Random acts of kindness make my heart sing...

Tuesday, January 14, 2014

Family Reunion Favor

We have a family reunion coming up and I ran across this picture of my mom with her sisters.  I printed it on shrink plastic (be sure to read all the instructions before you print on it), then shrunk it in the oven and now they're ready to have a magnet glued on the back.

If you haven't played with shrink plastic, it starts out thin enough to run through your printer, cuts with regular scissors and when you place it in a warm oven it shrinks 50% and to the thickness of a nickel.  It's great for jewelry, Christmas ornaments, cupcake decorations and on and on...

Thursday, January 09, 2014

Feeling Special

Feeling extra special.  I received a box of Harry and David pears today!  Yummy!

Tuesday, January 07, 2014

Valentine's Day Ideas


I had such a fun time making all of these projects using the EZScreenPrint product.  You start by creating just the design you want - yes, you use your own design - that's what makes this product so neat - you can totally customize whatever you want! 


Greet your guests with a cute hanging decoration.  I put cup hooks under the handrail on my stairs so I can decorate for all of the holidays.  A few of these would also look great hanging from your light fixture.
Use fabric paint and stencil on cloth or paper napkins.

 I love this centerpiece.  I stenciled the hearts onto heavy cardstock and while still wet, I sprinkled on glitter.  Let the paint dry. Cut them out, glue a skewer to the back and when they're dry, add them to your floral arrangement.
 Cupcakes are all the rage.  I stenciled on shrink plastic that's for use with ink jet printers.  Right after I applied the paint, I placed a paper towel over the paint and gently blotted it.  If you don't, your paint will get kind of furry looking and we can't have that!  Follow the instructions on your shrink plastic to shrink.  Oh!  For those who have never used shrink plastic (I have adored shrink plastic since I was a kid) you do your image on the plastic, put it in the oven and it shrinks about 60%, gets the thickness of a nickle and hard.  Great for making cupcake picks and tons of other projects.  Another, oh!  As you're cutting out each cupcake pick, leave about a 2" long x 1" wide piece at the bottom to insert into the cupcake.
 Come on over, I have cupcakes!


You'll want to make your gifts extra special too.  Stencil right on the wrapping paper, gift bag or card.  Sprinkle on some glitter if you'd like and be ready for a special evening.
This t-shirt adds a great touch to tie your entire Valentine's Day celebration together.  Add some iron-on crystals in a coordinating color and you're ready for the perfect party!

Ready to try screen printing?  Get started with a 15% off discount - just use joan15 when you're checking out and there's no minimum order.  Screen printing is as addicting as chocolate!  www.EZScreenPrint.org  Check it out!


Saturday, January 04, 2014

Do It Yourself Screen Printing

I'm having a fun play day getting ready for Valentine's Day using the EZScreenPrint.  I was amazed that in less than an hour I could make my own custom silk screen stencils and be ready to make awesome creations.
Once you print your artwork, it only takes 1 minute exposure to the sun to 'develop' and a little bath time. Love, love, love EZScreenPrint!!!  For those who are having less than sunny days at the moment, they also sell a light kit so you can make screens 24 / 7. (Since I live where we sometimes have dense fog, I know I'm going to be using my light a lot.) Check out the Customer Showcase for year round inspiration.  www.ezscreenprint.com 

Want to create your own custom designs for an upcoming family reunion, sports team, birthday party, craft ideas, etc., etc., etc.? Get 15% off when you use coupon code JOAN15 at checkout - no minimum!!!

I'm outta here and back to making Valentine's Day projects with the beautiful hearts.  Check back because I'll post my finished projects very soon!

Sunday, December 15, 2013

EZScreenPrint

It's super easy and fun to create custom printing on just about anything with the EZScreenPrint kit.  Check out their website - it only takes a 1 minute exposure to sun to make a custom screen - imagine ALL the possibilities.  Ready to get started?  Use JOAN15 at checkout to receive a 15% discount with no minimum.  Have fun!  Let me see your creations!

Saturday, December 07, 2013

Wilton Edible Accent Stars

Thanks to the Wilton Edible Accents I got at Michaels, I'm ready for a cookie exchange.

Candy Cane Chocolate Chip Cookies

I made these yummy cookies for a cookie exchange tonight.  It's a different idea - each of us takes one dozen baked cookies and the rest of the dough is divided up (I put mine in zip-top bags) and each of us gets to take home eleven taster sizes of dough that we can bake or freeze.  Can't wait to see the variety!